I wanted to make ghost treat bags for the girls I visit teach, but I couldn't find white lunch sacks anywhere. I know they used to have them; I've bought them before. But, I couldn't find any. I was set on my idea, though, so I made my own little white treat bags out of printer paper. Here's how to do it:
1. (Which apparently I labeled as #3 in the picture, with step 3 labeled as #1. Oops.) Start with a sheet of printer or copy paper.
2. Fold in half like a book.
3. (incorrectly labeled as #1) Tape together on the right side.
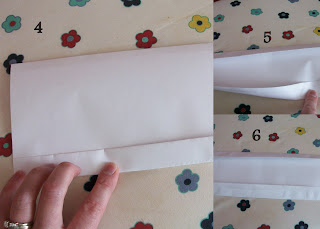
4. Fold in the the right side about 1 inch.
5. Fold in the left side about one inch.
6. Both long sides are folded in.
7. Open the folds and fold one of the creases in the opposite direction to make the flat side of your bag (see 8). Repeat on the other side until you have a rectangle (see 9).
10. Flatten out again.
11. Tape bottom closed.
12. Fold bottom in about 1 inch. Unfold. Refold one of the creases in the opposite direction as done in steps 8&9.
13. Flatten out the bottom of your bag. There will be a triangle on each side.
14. Fold in both triangles.
15. Tape triangles down.
16. You should have a small rectangular bag.
17. Flatten the top of your bag, with the sides tucked in.18. Cut a rounded top.
19. Open up the bag.
20. Add googly eyes.
Fill with treats and enjoy the cuteness!


No comments:
Post a Comment